Showing posts with label Things we Heart. Show all posts

Wednesday, March 14, 2012

Healthy Cooking for Kids: Free Cooking Class at Williams Sonoma


William Sonoma is offering a free "Healthy Cooking for Kids" class on Sunday, March 25 at 12:00 noon.  To attend, simply sign up ahead of time at your local Williams Sonoma store.  Kids are welcome to attend the class with a grown up.  I signed up myself and WP!  When I signed up, they told me that:

  • they will show techniques and tips for involving kids in the cooking process
  • they will be making Cauliflower & Cheese as a healthy alternative to Mac & Cheese
  • they will be using the juicer to make fresh juice
  • the day of the class, attendees get 10% off a store purchase 
Williams Sonoma has a neat little 'kids' section of the store with lots of tools that make food and cooking very kid-friendly.  I recently got the mini/kid version of these veggie scrubbing gloves so that WP can help me wash veggies! 

FYI - I am not paid by Williams Sonoma to say any of this... I just thought our readers would like to know! 


Friday, February 17, 2012

Meal Swap

You may or may not have seen us comment on each other's food posts about how much we enjoyed eating them or that we hope to try it next time they make it.  Maybe you think we are sister-wives, living on a compound sharing responsibilities and a husband?!  In reality, we have a pretty sweet set-up that is simple and helps both of us out.

We got the idea from another mom in our neighborhood who was switching meals with her neighbor across the street.  On Mondays, Mama A was responsible for delivering food to Mama B and on Wednesday Mama B would deliver to Mama A.  They often met each other in the middle of the street for the exchange and went home to enjoy.  They loved it because it was little trouble to double a recipe once a week and then they got to enjoy a home-cooked meal with NO work on another day.

We talked about trying it for over a month!  It's kind of important that you have similar tastes and compatible schedules so we wanted to make sure we were on the same page.  Our agreement is a little different than our friends' but it's working out great!  Basically, if one person is meal planning for the week, they'll text and say
'we are having this, this, and THIS on these days.  Would you like to trade this week?' 
And, in general, the response is
'I would love to try THIS on this day.  Here are YOUR choices-' 
It is really easy and laid back and it's been fun getting meal ideas from each other.  Sometimes we'll go weeks in a a row of trading and then weeks without trading.  Sometimes, we even spread it out over two weeks.  There is something so wonderful about playing with your kids at a time when you are normally hustling to get food on the table.  Everyone is just in a better mood.  Then, when we hear the knock on the door, we all answer it together, mom grabs the hot paper bag and takes a big whiff as we move straight to the table.  Heaven!
This had Sausage and Pesto Ravioli, garlic bread, and sliced grapefruit.
Tips to make this work for you:
  • Have a recipe swap! If you don't have someone in particular in mind, having a recipe swap over ice cream may the way to find one!  Ask questions like 'what's you favorite type of food or favorite restaurant.'  This will give you both an idea of what types of foods the others like.
  • Meal time should be similar unless delivering food to-be-cooked.
  • Keep the meal simple, trying to do no more than 2-3 dishes/containers.  Any extras I try to make disposable.
  • Just like in your own home, keep healthfulness in mind.
Red Beans and Rice delivered piping hot! KC had two full servings:)
Still not sure this is for you . . .
  • The openness of our arrangement helps both sides not stress about it.  If this week doesn't work, then you just move on.  If Monday you have dinner out, you don't have to feel like you are letting someone down by not making them dinner.
  • If you work full time, find someone at work who you can switch casseroles etc. with once a week or month.  
  • If you are only feeding one or two mouths in your house, find a couple in the same boat and trade.  It's easy to get tired of cooking for two at the table and then eating leftovers for four days!
  • Even if you don't want to trade with someone else, you could plan to double a recipe once a week and freeze it for the next. 

I hope you can find some inspiration in this! 

Saturday, February 11, 2012

Ranch Roasted Potato Hearts

Ranch Roasted Potato Hearts with a BLT - a great dinner!

I came across some Roasted Potato Hearts on Pinterest, originally from Haniela's blog. I had never thought to use a cookie cuter to make shapes out of potatoes, but I love the idea and incorporated it here into one of my favorite, easiest recipes: Ranch Roasted Potatoes.  The recipe below is for simple Ranch Roasted Potatoes. To make the hearts, just use a cookie cutter after slicing the potatoes and follow the rest of the instructions as listed. Even just a handful of hearts (or any shape) makes these already-good potatoes a little extra special. 

Ranch Roasted Potatoes
This is my ‘go to’ side dish that works with almost any meal. I got the original recipe from my mom, and I make several variations of it. My favorite is to actually omit the ranch dressing mix and season instead with salt, pepper, onion powder and garlic powder.  Sometimes I top with cheese (I like parmesan or cheddar on these) before baking. 

So, really, the recipe could go like this: cube some potatoes; put 'em in a Ziploc freezer bag with a little olive oil; toss to coat; add some seasonings and maybe some cheese; bake for 30 minutes at 450. But here's the "official" recipe:

1 packet Hidden Valley Original Ranch Dressing Mix
2 lbs small red potatoes, sliced or cubed
Enough olive oil to lightly coat potatoes - about 1-2 tablespoons

Place potatoes in large plastic (freezer) bag. Add olive oil and toss to coat.  Add dressing mix (or spices/seasoning) to bag and toss again. Bake on baking sheet lined with foil at 450 for 30 minutes or until potatoes are browned. 


I sliced my potatoes on my mandolin at 3/8"


As you can see, I only did a few hearts and then quickly cut up the remaining potatoes.

Love, Lauren


Friday, February 10, 2012

Rice Krispies Treat Heart Pops


A few things inspired me to make these Rice Krispies Treat Heart Pops:
  1. We had a Valentine's Day Party to go to, hosted by one of WP's friends.  I was wanting to take something special, but hadn't planned anything. So, I had settled on taking my quick and easy garlicky hummus, until....
  2. I saw these pink and white marshmallows on special at HEB (FREE when you buy almond bark!)  Of course I got them, unsure of what to do with them. But then....
  3. I found the cutest heart-shaped measuring cups in the $1 bin at Target.  And so....
I got pretty excited to make these, using my favorite recipe for Rice Krispies Treats.  FYI, this is my first time to ever make "pops" because they intimidate me.  But these really weren't too hard or time consuming, and I will definitely be making them again.  I made 24 Heart Pops, start to finish including cellophane wrapping, in under an hour.  If you are allowed to take homemade treats to your kiddo's school, these would be so perfect. 

Rice Krispies Treat Heart Pops
4 tablespoons butter
1/4 teaspoon salt
1/4 teaspoon pure vanilla extract
1 10 oz bag of marshmallows (pink & white if you can find it) OR 7 oz marshmallow cream 
5 cups Kellogg's Rice Krispies cereal

1/4 cup heart-shaped mold (or any heart-shaped mold you have. A small dish would work.) 
12 paper drinking straws
24 cellophane treat bags with ribbon and/or ties

Clean, then coat the inside of the heart-shaped mold with cooking spray. Set aside.

In a large saucepan, melt butter over low heat.  Stir in the salt and vanilla, then add marshmallows.  Stir until completely melted then remove from heat. Add Rice Krispies cereal and stir until well coated. 

Using greased hands, firmly press 1/4 cup of Rice Krispies mixture into the heart-shaped mold. Cool slightly (for just a few seconds.) Remove the mixture from the mold by turning the mold upside down and tapping it on the back if needed. Place on wax paper and allow to cool before wrapping. Repeat until you have molded all of the mixture.

Cut each of the 12 paper drinking straws in half. Insert a straw into the bottom of each heart. Once cooled, insert each Heart Pop into a cellophane treat bag and tie with ribbon. 

Makes approximately 24 hearts (1/4 cup each). 

 Note: this same method of spraying the heart-shaped mold with PAM works for just about any holiday (plastic eggs at easter, etc...) AND... I just saw on Pinterest and here that a cookie cutter sprayed with cooking spray works too!

Print recipe here.

Happy Valentine's Day! 
Love, Lauren


The pink & white marshmallows from HEB.
They made such a pretty color when melted
and even had a slight strawberry flavor to them. Mmmm.

Here is the 1/4 cup measuring cup from the Target $1 bin
that I sprayed with PAM and used as a mold for all of the Pops. 
Paper drinking straws inserted into the hearts to make Pops.
All wrapped up and ready for the party!
I ran out of straws, so wrapped a few plain hearts.

Thursday, February 9, 2012

Pinterest-inspired Toy Storage & a Giveaway!


I'm in love with Pinterest.  It's full of great ideas and is so easy to organize anything you'd like to remember.  One of my first Pins was of these storage bags.  When my mom got on Pinterest she saw them on my board, made a pattern, bought some fabric and got to work.

Wednesday, February 8, 2012

Organizing Art Supplies

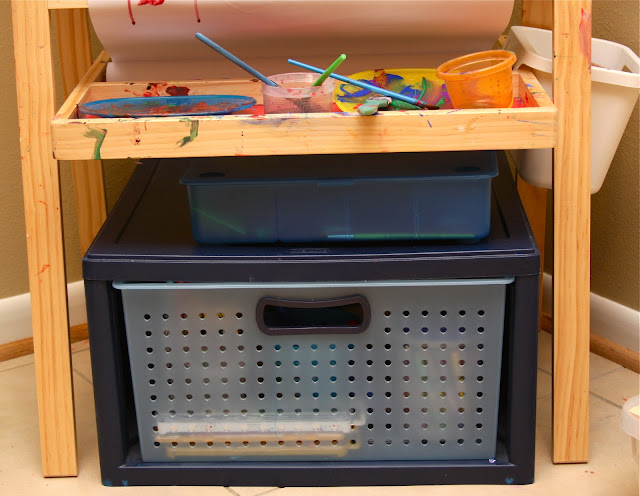
We love our easel and use it almost daily.  I put a bunch of art supplies on our Christmas wish list and received just what I wanted!  The boys have loved playing with all the different paints and stamps and colors but it was getting out of hand. Things were being thrown aside and stored in crazy places (the bathroom and kitchen cabinets).  I invested in two inexpensive pieces and there is harmony again.

I like this Sterlite drawer ($20 at Target) because it fits nicely under the easel, it is tall enough that I can have containers for pens to sit upright, and it's easy enough for my son to open and close by himself.  It's also deep enough that I can put the paint in the back and he never seems to see it without me getting in there too.

I also bought a plastic storage bin($4) from Ikea that is reminiscent of my Hello Kitty pencil boxes in elementary school but on a larger scale.  Paint brushes and stamps fit perfectly and it fits right on top of the drawer.
After three weeks, it doesn't look too much different than this . . .  Success!

Monday, February 6, 2012

Strawberry Hearts


With Valentine's Day so close, I have hearts on the brain!  I couldn't help but think of hearts when I pulled my most recent strawberries out of the fridge. So I cut the green tops off with a horizontal slice, off as usual.  Then, I cut little triangles out of the top of the strawberries and slightly rounded off the edges.  Such an easy way to make a meal or snack a little more special!

Tuesday, January 31, 2012

'Smores Without a Campfire

"This is 'smores stuff. First you take the graham. You stick the chocolate on the graham. Then, you roast the mallow. When the mallow's flaming, you stick it on the chocolate and cover it with the other end. Then, you scarf."  ~ The Sandlot

There are three secrets to the amazingness of these 'Smores:
  1. Homemade Graham Crackers
  2. Dark Chocolate
  3. No campfire needed!
They package nicely as a gift!

 
After 5 minutes in the oven (@400), they come out toasty, melty and warm 

I don't even know where to start on how much I love these 'Smores Without a Campfire. I only know about them because they were given to me as a gift by my sweet friend, Celani. She perfectly packaged the homemade graham crackers, dark chocolate and large marshmallows along with the recipe and instructions. She also included a fluted pastry cutter and the cinnamon sugar topping so I could re-make the graham crackers. Let me tell you, this was a wonderful gift to receive!  I enjoyed eating them the first time, and I have enjoyed making them for my family and friends again and again. 

So, here's the thing. You COULD use store bought graham crackers and make these 'Smores by following 3 simple steps: assemble 'Smores, bake @ 400 for 5-7 minutes, and enjoy!  

But... you would be missing out on a real treat if you didn't make the homemade graham crackers. They are special.  They are worth the effort to make. In fact, last summer, I made a batch of these and packed them in my carry-on luggage so that we could make 'Smores Without a Campfire on vacation. 

Homemade Graham Crackers (adapted from Gifts Cooks Love
1 1/2 cups graham flour, plus more for dusting
3/4 cup all-purpose flour
3/4 teaspoon kosher or sea salt
1/2 teaspoon baking soda
1/2 teaspoon ground cinnamon
4 tablespoons unsalted butter, room temperature
1/3 cup packed light brown sugar
1 large egg
1/4 cup honey
2 teaspoons pure vanilla extract
1/4 cup turbinado sugar (or Sugar in the Raw) mixed with about 1 tsp cinnamon


In a large bowl, sift together the graham flour, all-purpose flour, salt, baking soda and cinnamon. Set aside.  In the bowl of a stand mixer fitted with the paddle attachment (oops, I used the whisk!), beat together butter, salt and egg on high speed until smooth (2-3 minutes.) Add the honey and vanilla and beat until smooth, scraping down the sides as needed. With the mixer on low, add 1/2 the flour and combine. Add the remaining half and mix until just combined - don't over mix!  Press the dough into a flat disk (I did this on my pizza stone), cover in plastic wrap, and refrigerate for 30 minutes. 


Preheat oven to 350 and line 2 baking sheets with parchment paper (don't skip the parchment paper - my grahams stuck on non-stick cookie sheets without it.) Roll out parchment paper for a work surface and liberally dust it with graham flour. Roll out the dough, as close to a square as possible, 1/8" thick. Use a pastry cutter with a fluted wheel to cut graham crackers into desired size. (I cut most of mine slightly larger than the chocolate squares for 'Smores; but I cut a few bite-sized grahams for snacking.)  

Transfer grahams to parchment lined baking sheet, about an inch apart. Poke holes into each graham.
Sprinkle with cinnamon-turbinado sugar mixture. Bake at 350 for 14 minutes, or until slightly browned. Transfer to wire racks to cool.
Once graham crackers have cooled, top with dark chocolate squares (I used 2 chocolate squares per graham) and marshmallows (I used 1 large 'mallow per graham... 2 ended up being too much!)
Toast 'Smores in the oven at 400 for 5-7 minutes, or until 'mallow is toasty, chocolate is melty, and graham is soft. They will look like this:

After 5 minutes in the oven (@400), they come out toasty, melty and warm 
Unused homemade graham crackers can be stored, airtight, on the counter for up to three weeks. Or... packaged and given as gifts.
I stored the homemade grahams and the 'mallows

Print Recipe Here.
Saturday, January 28, 2012

Mélanger

Sample Dessert Bar Stylings by Mélanger
Did you know that Mélanger is a French verb meaning to "mix or blend"? I know this because my friend, Celani, recently started her own business: Mélanger   

Mélanger sells homemade confections (made from organic products whenever possible) and specializes in dessert bar styling for parties and events in the Houston area.  So, Celani not only bakes delicious desserts, but packages and presents them in a way that brings big smiles.  I know first hand: she baked cupcakes and helped us style a "Make Your Own Cupcake Sundae" bar at WP's 2 year old birthday party. There were lots of smiles from kiddos as they got to grab handfuls of bright candy to top their Cupcake Sundaes with. It was fun to watch.   
I cherish this picture (and the memories) of WP's 2nd Birthday
and the "Make Your Own Cupcake Sundaes" Celani provided!
If you are in the Houston area and need homemade treats for Valentine's Day, or any special occasion, keep Celani in mind. She is as sweet as the treats she bakes, and we know you will love working with her!


We have an upcoming post, inspired by Celani, that we are very excited about!! Stay tuned....
  
Mélanger is a “cottage food production operation” under Texas Health and Safety Code Section 437.001(2-b). For a complete menu of confections, please visit www.melangerdesserts.com.


Love, Lauren

Friday, January 6, 2012

King Cake


Happy January 6th!  Did you know that today, known as "King's Day" or "Epiphany", officially marks the start Mardi Gras season?  "Epiphany" comes from a Greek word that means "to show." Jesus first showed himself to the three wisemen and to the world on this day. You may be thinking, "I didn't know that! What can I do to celebrate Epiphany?" The answer, friend, is to enjoy a King Cake! (New Year's resolutions can wait.)
Why is a King Cake the perfect way to celebrate?  
  1. Because King Cake is delicious. It is a pastry that resembles a cross between coffee cake and a buttery croissant. Filled with cinnamon, cream cheese and/or fruit. Topped with icing. Decorated with sprinkles. 
  2. Because King Cake is symbolic and rich in history. Reportedly first brought to the US from France, the cake is decorated in royal colors of purple, green and yellow. Purple for "Justice," green for "Faith," and gold for "Power." These colors were chosen to resemble a jeweled crown honoring the Wise Men who visited the Christ Child on Epiphany. 
  3. Because King Cakes are fun...for kids and grown ups. Many King Cakes come packaged with Mardi Gras trinkets such as beaded necklaces or masks. And traditionally, a tiny plastic baby (symbolizing baby Jesus) is placed inside each King Cake. When the cake is sliced and served, each person looks to see if their piece contains the "baby." The person who finds the baby is named "King" for a day and bound by custom to host the next party and provide the King Cake. (With most King Cakes, you have to insert the baby yourself. Don't hide the baby if it is small enough to be a choking hazard!)  
It's safe to say that I am enamored with both the taste and history of the King Cake. I have loved it as long as I can remember. Maybe because I only had it once a year growing up. Or maybe it was because my dad's boss would send us the best of the best - a King Cake overnighted from Randazzo's bakery in Louisiana.  I still remember, as a kid, how excited I would get when I saw that big white box sitting on the kitchen counter in January.  
So, pick up a King Cake at your grocery store or local bakery, and start at January 6th tradition in your family today! 
(Note: I've tried grocery store versions of King Cake several times, and none are quite as good as Randazzo's.  But this year I got a cream cheese filled cake from the in-house bakery at HEB, and it is wonderful!) 

Tuesday, December 20, 2011

Picture Gift Tags


My in-laws were visiting this weekend and my MIL had the sweetest addition to our gifts.  Instead of writing each of our names on the Christmas presents, she printed a picture of the recipient and taped it to the gift.

Tuesday, December 13, 2011

Pinterest Finds

If you aren't on Pinterest, you may be missing out.  It's basically an online pinboard that you can organize and share.  You can also follow friends or people you find interesting.  I've been having fun exploring different categories like arts & crafts, photography, kids, and gardening.  Her are a few fun ones I've pinned recently.
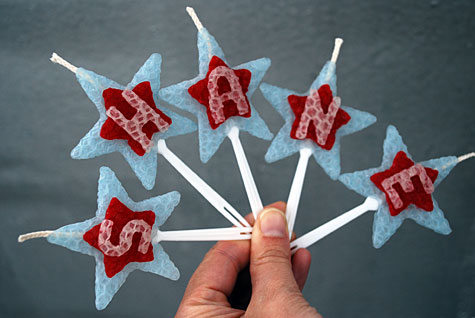
Beeswax DIY Personalized Candles from Merriment Design- soo cute and really simple!
Knob Rack from European Chic- Oh, the possibilities!
40 Ways to entertain your kids while laying down from babycenter.com-  I needed this last week! I think my favorite is "what's on my butt?"


Click here if you'd like to follow me.
Follow Me on Pinterest
~Kim